

*This post may contain affiliate links. This means we may make a commission if you purchase an item using one of our links*
When you think of our solar system and the idea of observing it, I’m sure the first celestial entities that come to mind are the Moon, the Sun, Mars and likely Jupiter afterwards right?
I guess it doesn’t matter really matter all that much but, if you’re here right now Jupiter’s swirly atmosphere, the huge red spot and of course all the moons orbiting the planet from Ganymede, Europa, Io (and its 76 other moons) are things you’re more certainly looking to explore.
That’s where this article comes in, with the aim of explaining how you can see Jupiter with a telescope and unsurprisingly, it’s not as complicated as you may think.
Firstly, you’ll require software like Stellarium or the database from a GoTo mount to locate Jupiter. Secondly you’ll need a decent sized telescope with a 6″ aperture plus to be magnify your system for the finer details and lastly you’d need an eyepiece that preferably allows for a 180x magnification to observe Jupiter and its moons’ at its best.
Throughout the rest of this post, I’ll be going over the more technical aspects of locating Jupiter along with some cool sights to see look out for when observing this big red gas giant.
What Is Jupiter?
Table of Contents
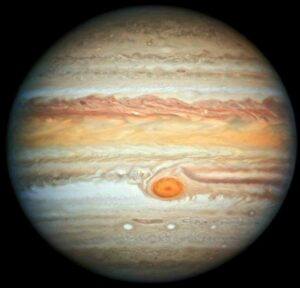
Jupiter is the 5th farthest planet from the Sun and is also the largest celestial object (not including the Sun) in our solar system. It’s what regarded as a gas giant and is actually so large that not only would 1300 Earth’s fit inside it, in fact every planet within our solar system would be able fit inside it too (crazy I know!).
It’s approximately 143,000 kilometers (about 89,000 miles) wide at its equator. At its farthest Jupiter is roughly 600 million miles away from Earth whilst at its closest it’s roughly 400 million miles away.
What’s interesting about Jupiter is that even though Mars can come really close to earth when orbiting the sun, Jupiter will always appear larger than it. This is because Mars’ maximum angular diameter is 25.1 whilst Jupiter never appears smaller than 29.8. This in turn will make it one of the easier planets to spot when you get your telescope out.
The planet has a very similar layout to that of our sun as its atmosphere is mostly made up of hydrogen and helium, the clouds of Jupiter are regarded as being really cold, hitting temperatures as low as -143 degrees Celsius whilst it’s surface is said to be as hot as 24,000 degrees Celsius, which is actually hotter than the surface of the sun.
In fact experts believe if Jupiter was 80 times larger than it already is, it would be regarded as a star. Jupiter orbits the sun via an ecliptical path around the sun which takes roughly 12 earth years for a full orbit. Jupiter also has the fastest rotation cycle where it completes a full rotation around the equator in 10 hours, which is much faster than Earth’s 24 hours.
Let’s not forget the 79 reported moons the planet has along with all its other cool features (which I’ll talk about below) so, it’s safe to say Jupiter is planet you could be viewing for endless hours and still not see everything, which is one thing that’s really cool about it.
Can You See Jupiter Without A Telescope?
If you’re curious about this, it actually is possible to see Jupiter without a telescope. This is because not only is Jupiter a huge celestial entity, it’s also the 4th brightest entity in our solar system, behind the sun, moon and venus.
However, without a telescope all you’ll see is a a bright ball of light which unsurprisingly isn’t an interesting thing to observe. Nevertheless, it is pretty cool that you can see Jupiter through just the naked eye.
What Equipment Will You Need To See Jupiter?
The previous section states that you don’t need a telescope to see Jupiter, for the most part you’d just need to understand it’s ecliptic orbit and you should be able to spot it. However, i know the main reason you’re here is to learn how to see the planet with one so, that’s what will be covered here.
Aperture
In order to be able to view the finer details of a scope, you would need to use a telescope. I mentioned in the beginning that a 6″ device would be ideal and there’s good reason for that.
The reason why is simple, in order to get a solid, detailed view of Jupiter you’d need to a system that can magnify the image you see through the lens anywhere from 120x+ as more zoom will allow you to see more of what’s going on around Jupiter.
As a 6″ aperture device allows you to magnify to 300x, this aperture is a good one to have, particularly for this planet and any others further out in our solar system. (if you’re looking to invest in eyepieces that are great for magnification purposes, I’d recommend checking our best of list out!)
This isn’t to say an 80mm scope wouldn’t be able to make out any details on Jupiter, it’s just that better views of the planet are generated when you can simply magnify further so, a 6″ plus device is ideal.
Coloured Filters
One concern I found when conducting my research is that when it comes to telescopes with apertures under 100mm (4″), they don’t always work well with colored filters.
Most people probably wouldn’t ever use any filters when viewing Jupiter however, there are quite a few benefits to having some in order to enhance certain features on the gas giant.
A light yellow #8 and yellow #12 can enhance the details on Jupiters bands whilst the #80A filter, which is a blue filter, along with #82A can really improve the planet’s details and shadows.
In fact the last 2 filters mentioned above are generally regarded as the filter for Jupiter observations, so it may be worth looking into it. Do keep in mind that the coloured filters won’t drastically improve the views but, they do make a noticeable difference
Besides a telescope (or binoculars even) and the coloured filters, there really isn’t much else you’d need to start observing Jupiter.
How To Locate Jupiter With A Telescope
There are a few ways you can locate Jupiter, the first way is to use software. One software that seems to be recommended on a regular basis is Stellarium, which is a great resource that displays the movement of the planets and stars in the sky, making it fair bit easier to determine where Jupiter is.
In order to use Stellarium to find Jupiter, you simply put in what time your planning to observe it and choose Jupiter in the options menu and the software should locate and centre it in your window.
The software probably won’t be needed if you have a computerized goto mount because you can simply put Jupiter’s coordinates into the database in there, after which the telescope will automatically lock on to the planet. But, if you haven’t got such a mount, Stellarium is definitely a tool you should use.
What Can You Observe On Jupiter?
Jupiter is one of the more interesting planets in our solar system to observe, I’d say that’s a lot more intriguing to view than the featureless Venus or even Mars.
So what is there to see on Jupiter?
Well, if you’ve got a powerful enough system, you’ll be able to observe the orange cloud bands around the planet, the red spot as well as the large library of 79 moons orbiting the gas giant.
In this section I’ll go over each one of Jupiter’s standout characteristics just so you have a rough understanding of what they are and why they’re worth looking out for.
The Great Red Spot
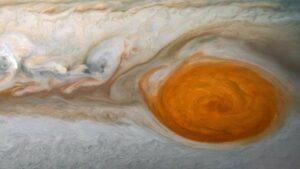
This is one feature that’s hard not to notice when looking at pictures of Jupiter so, it only makes sense that you should look out for it when observing Jupiter.
If you don’t quite know what the great red spot is, it’s actually a raging storm, that’s not only many times larger than the size of Earth but also an incident that has been raging on for hundreds of years.
As Jupiter completes a full rotation in around 10 hours, there’s plenty of opportunity to locate it but, if you’re struggling to find it, there are many apps and websites dedicated to helping you out.
One of the more prominent resources is this app called Jupiter Simulator, which is pretty much a must have app for astronomers observing Jupiter.
The Cloud Bands
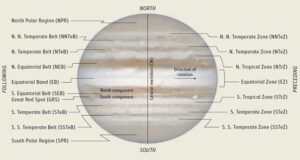
The cloud bands that we see on Jupiter are basically the atmosphere of the planet. Even at a magnifications of 60x, you should be able to make out the basic outline of the dark brown/orange bands around the planet and the closer you magnify, the more details you’ll be able to observe from the swirls in the clouds to shadings on Jupiter’s poles.
What you’ll be able to see on any given night will be dependant on the atmospheric conditions of the planet but, much like the red spot this feature is pretty hard to miss and is something you will inevitably see as long as you can zoom in close enough.
The Moons
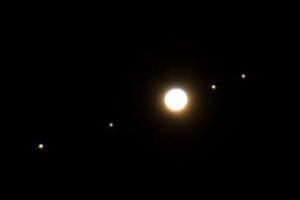
When you set up your telescope and position it to locate Jupiter and also use lower powered eyepiece to observe, you’d see a view much like the image above. What the image shows is besides Jupiter’s bright silhouette you’ll also see 3 – 4 of the gas giants moons, as very bright objects, in orbit.
Although only 4 moons are easily viewable, Jupiter actually has 79 moon. Those 4 moons, are simply Jupiter’s biggest moons and are called Europa, Io, Ganymede, and Callisto. These 4, at their discovery, were regarded as the Galilean moons due to them first being observed by Galileo in 1610.
If you want to observe any of Jupiter’s other moons, it will be possible to do but, you will need a significantly more powerful device to find them as they’re all significantly smaller and of course, not as bright but, with some effort they definitely can be observed.
Summary
Hopefully this article has helped you a little for when the times comes where you finally begin observing this big brown haze of gas, which I’m sure is pretty darn soon if you’ve read up till now.
On the other hand you may be looking to get in to astronomy but have yet to decide on the right telescope for this hobby. If you’re in such a predicament I welcome you to check out this list I’ve put together on a few great devices to go for.
Once again if you’ve made it to the end of the article, I hope you’ve learnt what you came here for and hopefully in your next Jupiter viewing session, you’ll have great time.

Very good article.
I got my very first good look at Jupiter last night. Jan 17,2023
Using a beginner 70/400 telescope with a 6mm eye piece. I calculated my magnification at only 66 but what a view. I had difficulty holding the scope in focus as it was breezy and my fingers were getting cold.
The view was incredible. The reddish brown stripes and the red spot clearly visible.. What most amazed me was it was the size of a quarter, or so it seemed. It filled my field of view. I was stunned. With a beginner telescope did I just get lucky and can not expect this kind of view again ? Tonight I am going to use a 1 1/2 Barlow lens to bring my magnification up to 100. My scope should be good up to 175.
This little scope really exceeded my expectatons and I do not understand how this could be. One thing is for sure, I will have it pointed up in the south west sky again tonight because I told the super giant that I would return.
I have been reading and watching Youtube videos and was not expecting much with a 70/400 telescope. Then i practiced focusing on things like water towers and cell towers with the 25mm eye piece. Holding the target steady and not moving the scope is my biggest challenge but I do not give up. I believe with pertinence, Perserverance and lots of practice these little scopes can open up a whole new experience to anyone.