
*This post may contain affiliate links. This means we may make a commission if you purchase an item using one of our links*
Collimation of a telescope is something you’ll need to do on a regular basis, especially with reflection optics, namely the Newtonian reflector. These types of telescopes are actually a lot easier to collimate than the information on it it would lead you to believe.
Collimation is simply put the process of realigning the mirrors within the scope so you can get a clearer and more precise image of what you’re trying to observe, which is what I’ll try and explain to on this post.
How You Should Get Started
Telescopes may come across as complex systems and they certainly are to an extent however, you should know that a scope is only really made of 3 main optical pieces which means the whole percodure isn’t going to be much more complex than the average jigsaw puzzle, once you figure out where the pieces should g.
In reality it won’t take hours or even around a half hour to sort the alignment, in fact once you’ve figured out the pieces, it’ll only take few minutes to get everything sorted.
Anyways regarding the 3 main optical pieces, the first optical piece is the primary mirror, the second is the secondary mirror which can aslo be know as diagonal mirror and the final piece is the eyepiece.
The eyepiece and primary mirrors are both referred to as active optical components whilst the secondary mirror is a flat piece of reflective glass. Keep in mind these points regarding the functions of the optics will be important further down the line.
Before going any further, you should first know what exactly we’re doing when trying to collimate a scope. In simple terms collimation is process conducted to ensure that the eyepiece is aimed at the center of the primary mirror, and that the primary mirror is aimed at the centre of the eyepiece. This of course is still a little easier said than done.
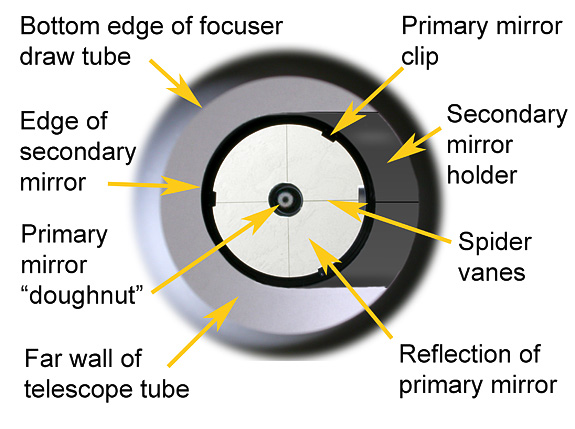
The first thing you’ll need to do to conduct the collimation is purchase a collimation cap. The next would be to ensure that the centre of your telescopes primary mirror should be marked.
Once these steps are accounted for, you’ll finally be able to proceed with the 2 – 3 minute collimation procedure.
What Are The Steps Needed For Collimating A Telescope?
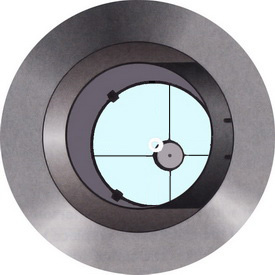
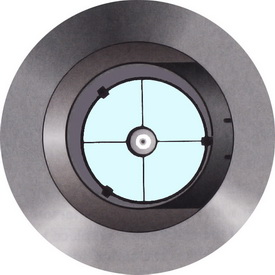
Collimating a telescope can be split up into a 3 step process. The first step is going to be the initial collimation otherwise known as the initial allignement. The way you’ll accomplish this is by putting a collimation cap on the focuser. If all goes well, the collimation cap should show the point on the cap as perfectly centered on the focuser.
Of course this is unlikely to be the case. In this case you’ll want to align the small black dot into the collimation caps circular white shape.
You can adjust the allignement by adjusting the tilt of the primary mirror by turning the collimation knobs at the back end of the scope, until that black dot located on the underside of the primary mirror becomes centered in the doughnut shape.
Bigger telescopes will be best collomated whilst one person adjusts the knobs at the back whilst the other looks at the collimation process. Another thing you should do is also only use 2 of the knobs at the back of the scope beacause it’ll simplify the process over using all 3 knobs to do the same job.

The first image is before the scope has been Collimated
The second image is when the focuser has been aligned.
The second step is aligning the secondary mirror. Depending on whether or not you’ve done everything correctly on the first step, the second step will probably done too however, it’s always a good idea to adjust the secondary mirror as it’s this mirror that will direct light to the eyepiece from the primary mirror so you can see the images.
If the second mirror is aligned properly, you’ll be able to transfer 100% of the light generated from the primary mirror to the eyepiece which of course will be the ideal position to be when observing deep space objects.
So how do you check if your secondary mirror is properly aligned?
What you have to do is use a collimation cap again but this time pay attention to the perimeter of the primary mirror and the outside edge of the secondary mirror. The main concern in adjusting the secondary mirror is that it just has way too many complicated moving parts.
However, although this is true, when you breakdown the movement of simply moving the mirror back and forth, along the length of the tube, you can also rotate it with respect to the focuser and change its tilt.
The first thing that you need to figure out is the back and forth distance of the secondary lens. This can be accomplished by using a tape measure where you’ll find out the distance between the top of the tube to the center of the focuser.
You’d want to get this measured as accurately as you can (within a few mm should be fine) . In regards to how you move the the lens back and forth, loosening the big central nut or screw on the spider will allow you to do so. The next step is to rotate the mirror. The aim here is to have the face of the secondary mirror pointed at the focuser.
The final step is regarding the tilt of the mirror. The aim here is to have the outer edge of the primary concentric with the outer edge of the secondary. In order to accomplish this you will need to purchase an Allen key.
Although adjusting the secondary mirror does require you to do a lot of work and can be useful, in reality it’s also among the least important parts to the collimation process. Normally this aspect should be adjusted to a decent level out of the box with most telescopes so it shouldn’t be your main concern.
The final thing you’ll need to worry about is Re-checking the primary mirror because after adjusting the secondary mirror, a few things will likely be misaligned. You basically follow the same steps as the first step.
Collimation Isn’t Really All That Hard…
Of course when you hear about the setting up process and all the moving parts associated with it, as a beginner to astronomy and telescopes in general, you might find the process of aligning the lenses quite daunting however, it’s far from being as complicated as you’d think.
Once you’ve got everything together and understand the basics of it, aligning a scope won’t take much longer than a few minutes.
If you’re planning of getting a telescope but don’t know where to look, check out my best of list for Inspiration.
Hopefully this guide has helped you on the setting up process of your telescope. If there’s anything else you’d like to add to this guide or if I’m missing anything that you would consider to be important when it comes to collimating the lenses, feel free to leave it in the comments below